Time needed: About 10 minutes
This guide walks you through setting up VAT validation for the first time. The Setup Wizard handles most configuration automatically. By the end, your checkout will validate VAT numbers in real-time and apply 0% VAT for eligible B2B orders.
Before you start
Make sure you have:
- •A WooCommerce store that's up and running
- •HTTPS enabled on your website (required for API requests to VIES)
- •Your BridgeSync licence key (check your welcome email or your account)
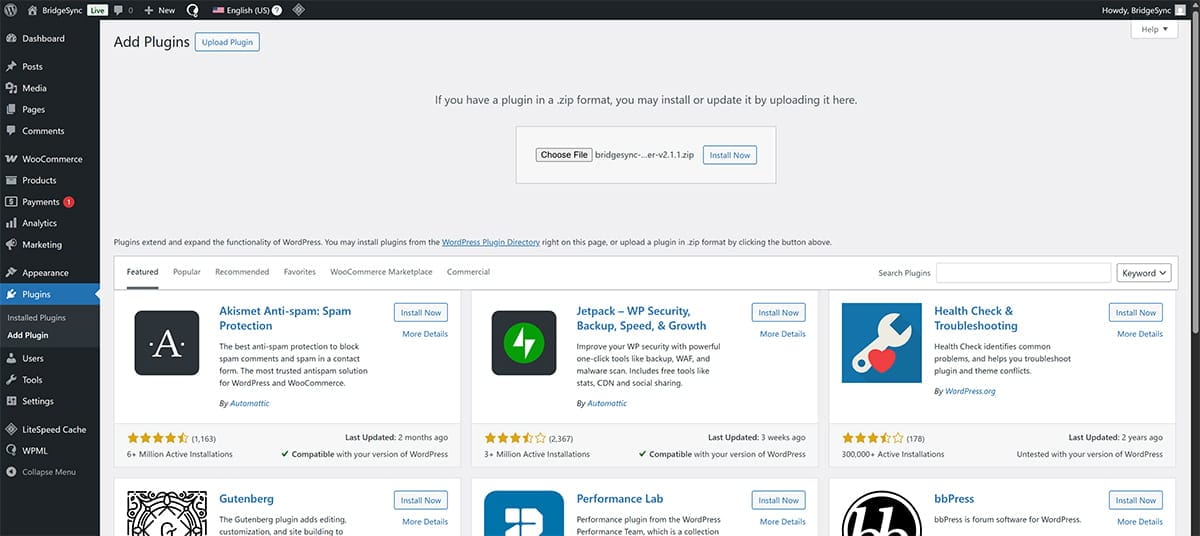
Install the plugin
Time: About 2 minutes
- Download the plugin ZIP file from your BridgeSync account
- In WordPress, go to Plugins → Add Plugin
- Click Upload Plugin at the top of the page
- Choose the ZIP file you downloaded and click Install Now
- After installation completes, click Activate Plugin
The Setup Wizard starts automatically after activation. If it doesn’t, go to EU VAT Checker → Setup Wizard in the WordPress sidebar.
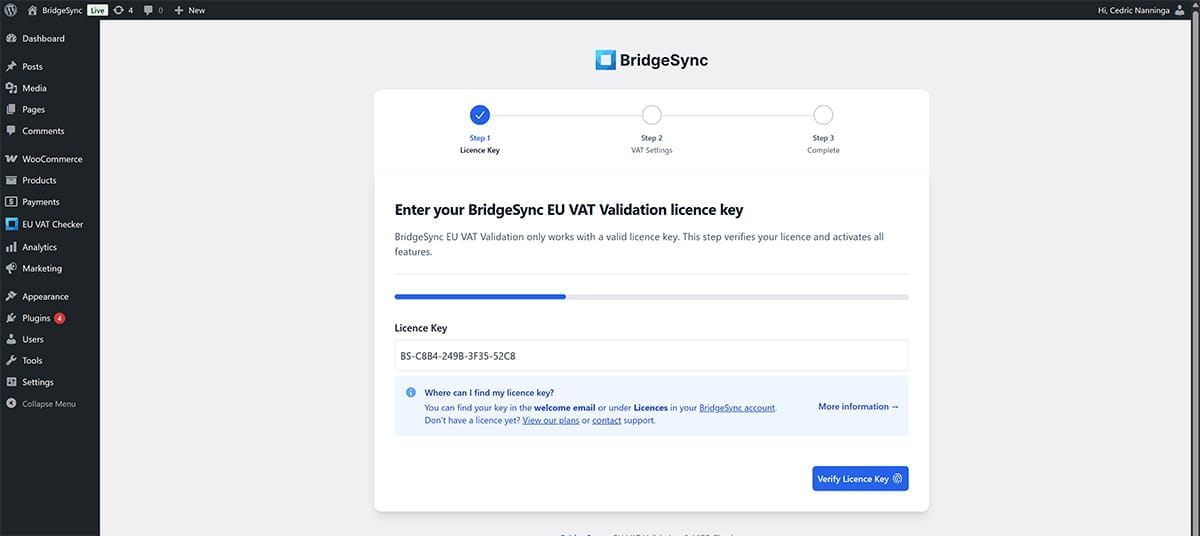
Enter your licence key
Time: About 1 minute
The Setup Wizard opens on Step 1: Licence Key. This is where you activate your BridgeSync licence.
- Find your licence key in the welcome email you received after purchase, or in your BridgeSync account under Licences
- Paste the licence key into the Licence Key field (it looks like
BS-XXXX-XXXX-XXXX-XXXX) - The wizard automatically validates your licence — wait for the green success message
- You’ll be redirected to Step 2 automatically
Licence validation failed?
- •Double-check you copied the entire licence key with no missing characters or extra spaces
- •Verify you’re using a valid, active licence (not expired or already activated on another site)
- •Make sure your WordPress site can connect to the internet (required for licence validation)
Still having issues? Contact our support team with your licence key for assistance.
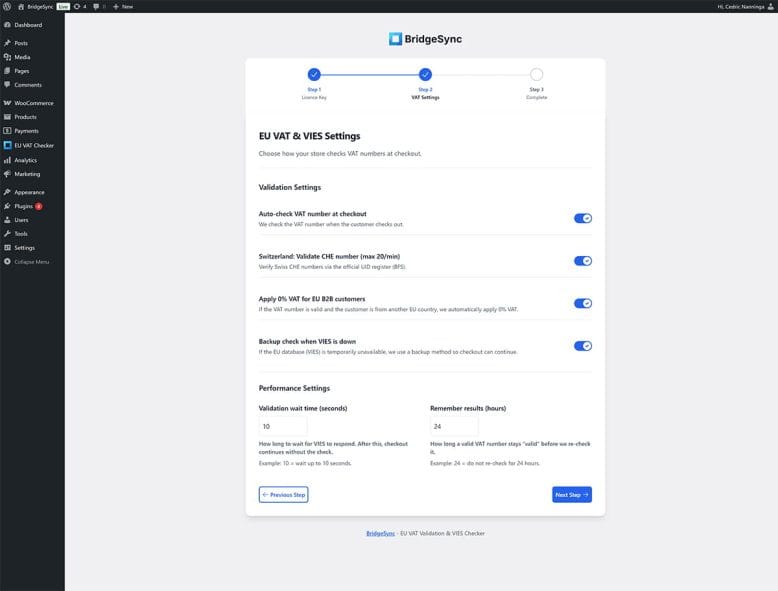
Configure VAT validation settings
Time: About 3 minutes
Step 2 of the Setup Wizard shows the VAT validation settings. The defaults work well for most stores, but here’s what each option does:
Validation settings
| Setting | What it does | Recommended |
|---|---|---|
| Auto-check VAT number at checkout | Validates VAT numbers against the EU VIES database when customers check out | ✓ On |
| Switzerland: Validate CHE number | Also validates Swiss business numbers (CHE) via the Swiss UID register | ✓ On (if you sell to Switzerland) |
| Apply 0% VAT for EU B2B customers | Automatically removes VAT for valid intra-EU B2B orders (reverse charge) | ✓ On |
| Backup check when VIES is down | Uses format validation as fallback if the VIES database is temporarily unavailable | ✓ On |
Performance settings
| Setting | What it does | Default |
|---|---|---|
| Validation wait time | How long to wait for VIES to respond before continuing checkout without validation | 10 seconds |
| Remember results | How long a validated VAT number stays cached before re-checking | 24 hours |
Review the settings and click Next Step to continue.
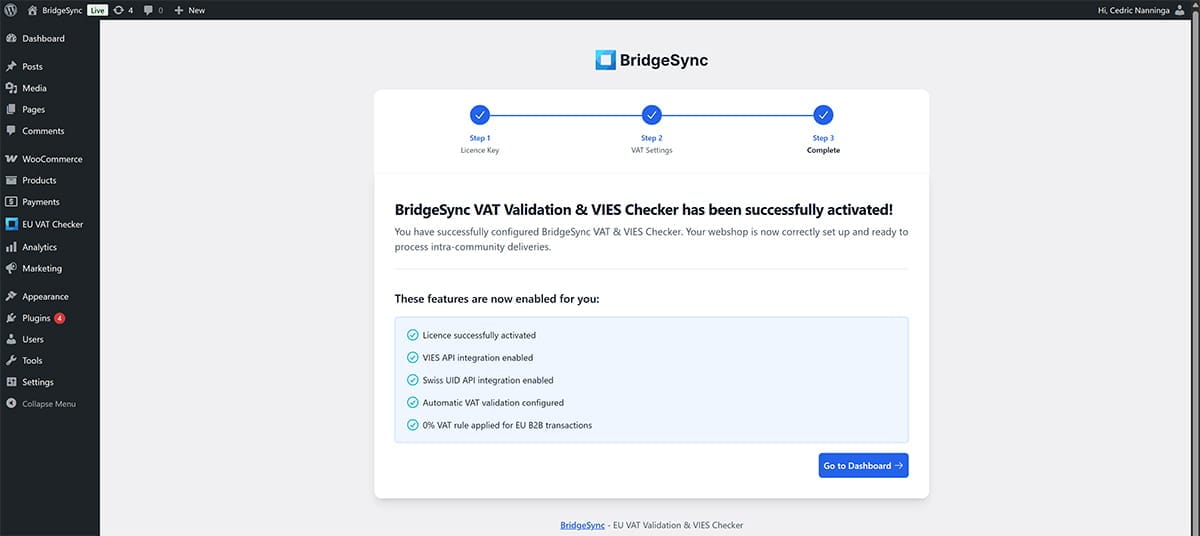
Setup complete!
Time: About 1 minute
Step 3 confirms that everything is configured correctly. You’ll see a list of features that are now enabled:
- •✓ Licence successfully activated
- •✓ VIES API integration enabled
- •✓ Swiss UID API integration enabled
- •✓ Automatic VAT validation configured
- •✓ 0% VAT rule applied for EU B2B transactions
Click Go to Dashboard to open the plugin dashboard where you can test the API connection and monitor validations.
Test your setup
Time: About 3 minutes
Test from the Dashboard
- Go to EU VAT Checker → Dashboard
- Find the API Testing section at the bottom
- Enter a test VAT number:
NL123456789B01 - Click Test API
- You should see a validation result within a few seconds
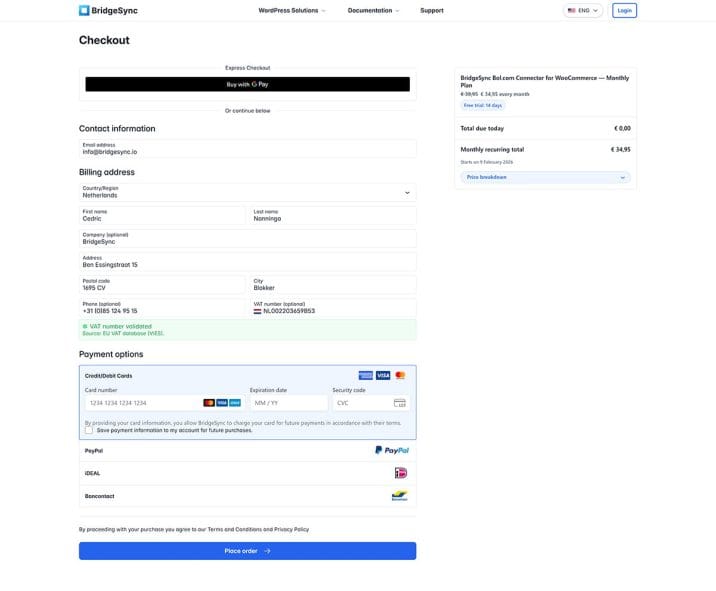
Test from checkout
- Add any product to your cart
- Go to checkout in an incognito/private browser window
- Select an EU country as billing country
- Look for the VAT number field and enter a valid VAT number
- The validation message should appear after a few seconds
You’re all set
VAT numbers are now validated automatically during checkout. Eligible B2B customers from other EU countries will see 0% VAT applied to their orders.
What to do next