Time needed: About 5–10 minutes
What you'll accomplish
Your invoices, credit notes, and packing slips will match your brand (logo, colors, company details) and you can choose different templates per document type.
Where to find template settings
All template and branding settings are in one place:
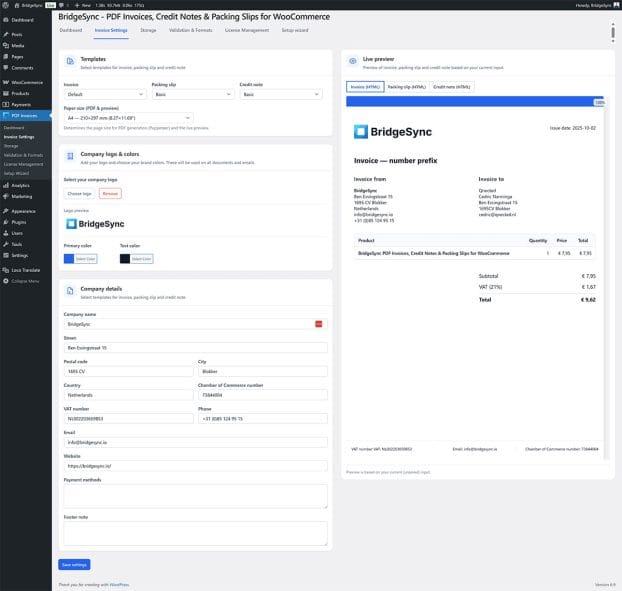
- Go to PDF Invoices → Invoice Settings in your WordPress sidebar
This page has four sections:
- Templates — Choose templates per document type
- Live preview — See changes in real-time
- Company logo & colors — Upload logo and set brand colors
- Company details — Address, VAT, and other business information
Choose templates per document type
Unlike the Setup Wizard (which sets one template for all documents), Invoice Settings lets you choose different templates for each document type.
- In the Templates section, find the three dropdown menus:
- Invoice — Choose Default, Basic, or Modern
- Packing slip — Choose Default, Basic, or Modern
- Credit note — Choose Default, Basic, or Modern
- Select your preferred template for each document type
- The Live preview on the right updates automatically
- Click Save settings when done
Paper size
Below the template dropdowns, you can change the Paper size:
- A4 — 210×297 mm (standard for Europe)
- Letter — 8.5×11 inch (standard for US)
Add or change your logo
- In the Company logo & colors section, click Choose logo
- Select a logo from your WordPress Media Library or upload a new file
- The logo preview appears below the button
- Click Save settings
Logo tips
- Use PNG format with transparent background for best results
- Keep file size under 500 KB for faster PDF generation
- Recommended dimensions: 300-600 pixels wide
Configure brand colors
- In the Company logo & colors section, find the color pickers:
- Primary color — Used for headers, accents, and lines
- Text color — Used for body text and labels
- Click Select Color to open the color picker
- Choose your brand colors or enter a hex code
- Watch the Live preview update in real-time
- Click Save settings
Update company details
- Scroll to the Company details section
- Update any fields you need to change:
- Company name, Street, Postal code, City, Country
- Chamber of Commerce number, VAT number
- Phone, Email, Website
- Optionally add:
- Payment methods — Text that appears in the payment section
- Footer note — Custom text at the bottom of documents
- Click Save settings
Use the Live preview
The Live preview panel on the right side of Invoice Settings shows exactly how your documents will look.
- Click the tabs to switch between document types:
- Invoice (HTML) — Preview invoice layout
- Packing slip (HTML) — Preview packing slip layout
- Credit note (HTML) — Preview credit note layout
- Use the zoom slider to adjust preview size
- Changes you make are reflected immediately (before saving)
Preview after saving
- Go to WooCommerce → Orders
- Open any order
- Generate or download a PDF (Invoice, Packing Slip, or Credit Note)
- Verify the styling matches your expectations
If you don't see your changes, see Template not applying for troubleshooting steps.
Verify
Success: Your PDFs show your logo, brand colors, and company details correctly on all document types.