Time needed: About 15 minutes
This guide walks you through setting up BridgeSync PDF Invoices for the first time. The Setup Wizard handles all configuration in 6 steps. By the end, your WooCommerce store will automatically generate professional PDF invoices, credit notes, and packing slips.
Before you start
Make sure you have:
- •A WooCommerce store that's up and running
- •Your BridgeSync license key (check your welcome email or your BridgeSync account)
- •Your company logo in PNG or JPG format (recommended: transparent PNG, max 500 KB)
- •Your company details (address, VAT number, Chamber of Commerce number)
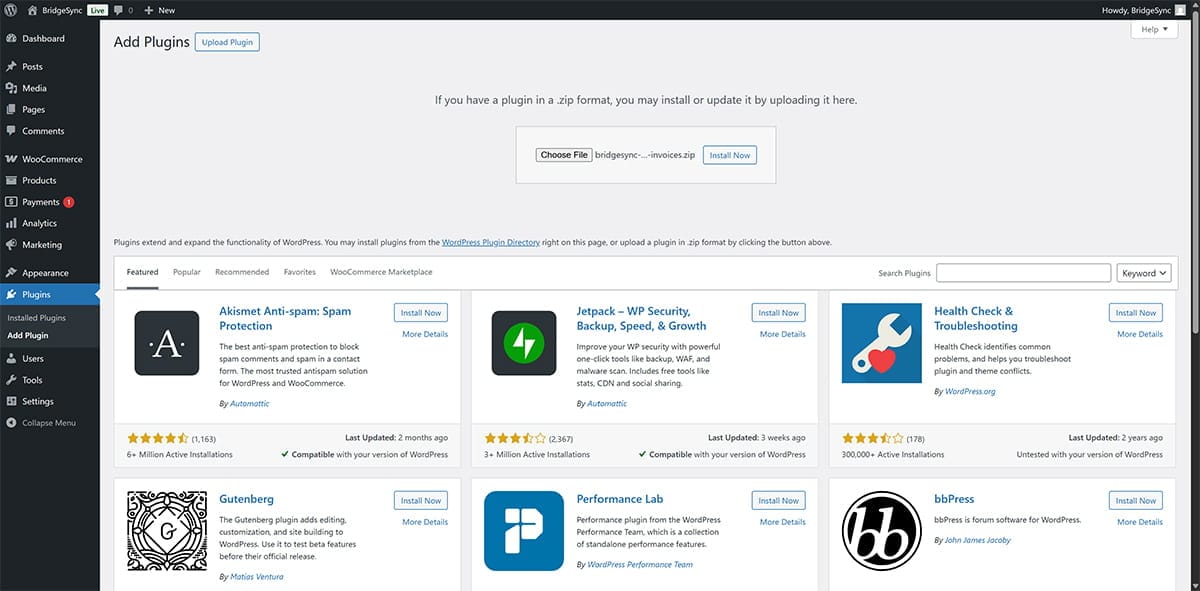
Install the plugin
Takes: 2 minutes
- Download the plugin ZIP file from your BridgeSync account
- In WordPress, go to Plugins → Add Plugin
- Click Upload Plugin at the top of the page
- Choose the ZIP file you downloaded and click Install Now
- After installation completes, click Activate Plugin
The Setup Wizard starts automatically after activation. If it doesn't, go to PDF Invoices → Setup Wizard in the WordPress sidebar.
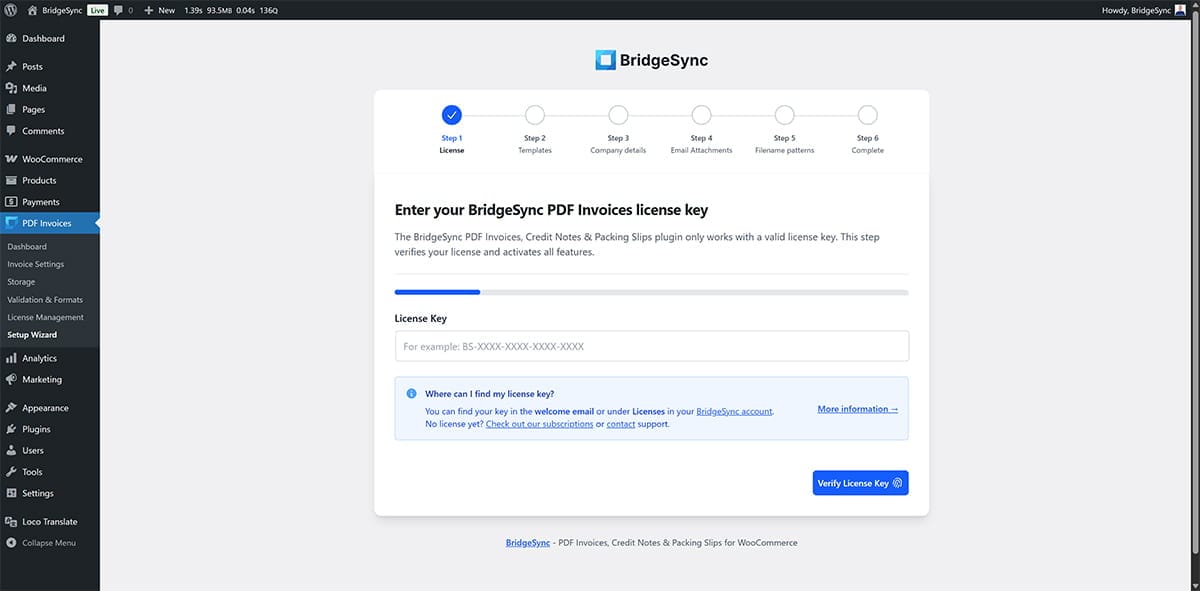
Enter your license key
Takes: 1 minute
The Setup Wizard opens on Step 1: License.
- Find your license key in the welcome email you received after purchase, or log in to your BridgeSync account under Licenses
- Paste the license key into the License Key field
- The wizard automatically validates your license — wait for the green success message: "License validated! Activating..."
- You'll be redirected to Step 2 automatically
License validation failed?
- •Double-check you copied the entire license key with no missing characters or extra spaces
- •Verify you're using a valid, active license (not expired or already activated on another site)
- •Make sure your WordPress site can connect to the internet
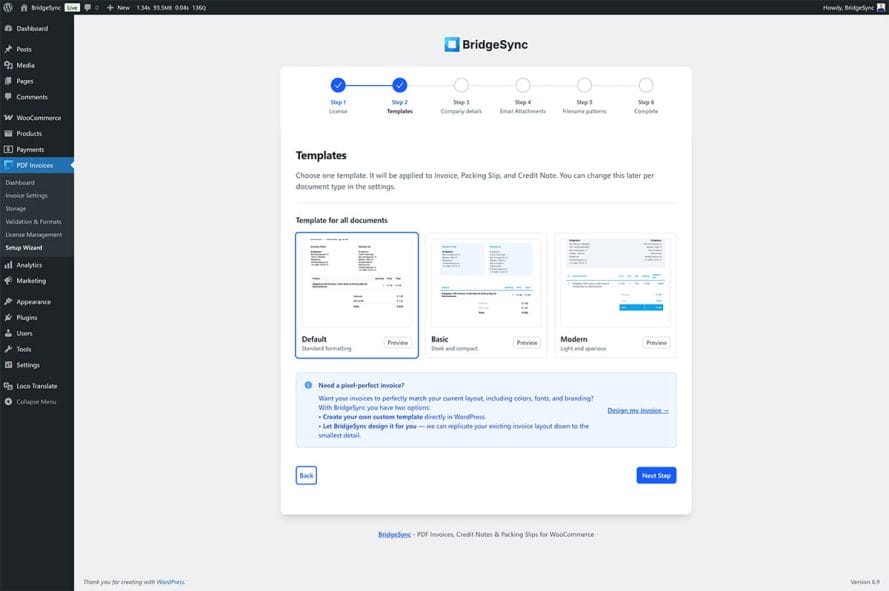
Choose a template
Takes: 2 minutes
Step 2 of the Setup Wizard lets you choose a document template. This template applies to all three document types (invoice, packing slip, credit note). You can customize per document type later in Invoice Settings.
| Template | Style | Best for |
|---|---|---|
| Default | Standard formatting with clear sections | Most businesses |
| Basic | Sleek and compact | Minimalist brands |
| Modern | Light and spacious | Premium/luxury brands |
Click the Preview button next to any template to see how it looks.
Select your preferred template and click Next Step.
Need a pixel-perfect invoice?
If you need invoices that exactly match your current design (colors, fonts, layout), BridgeSync offers two options: create your own custom template in WordPress, or let BridgeSync design it for you. Click "Design my invoice →" in the Setup Wizard for more information.
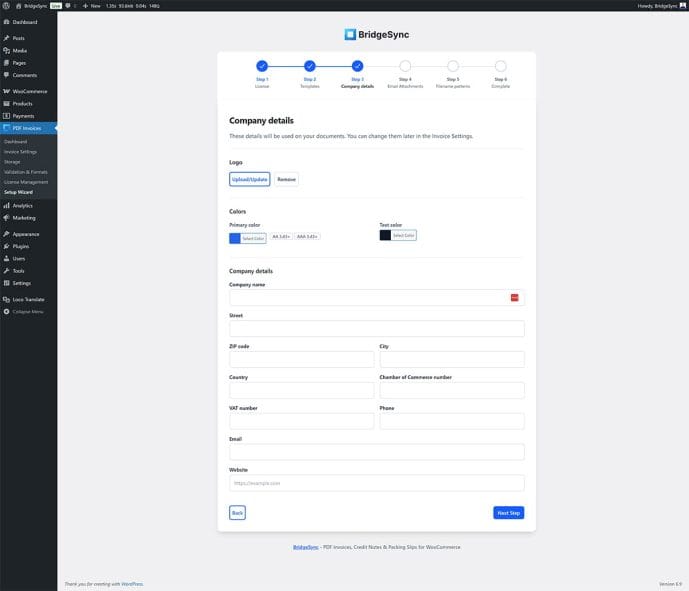
Add your company details
Takes: 3 minutes
Step 3 of the Setup Wizard is where you configure your branding and company information. Everything you enter here will appear on your invoices, credit notes, and packing slips.
Upload your logo
- Click Upload/Update in the Logo section
- Select your company logo from the WordPress Media Library or upload a new file
- PNG format with transparent background works best
Set your brand colors
- Click Select Color next to Primary color to choose your brand's main color
- Click Select Color next to Text color to set the document text color
- The wizard shows contrast indicators (AA/AAA) to help ensure readability
Enter company details
Fill in all relevant fields. At minimum, complete:
- Company name (required — shows a red indicator if empty)
- Street, ZIP code, City, Country
- VAT number (important for tax compliance)
- Chamber of Commerce number (KVK in the Netherlands)
- Email and Website
Click Next Step when done.
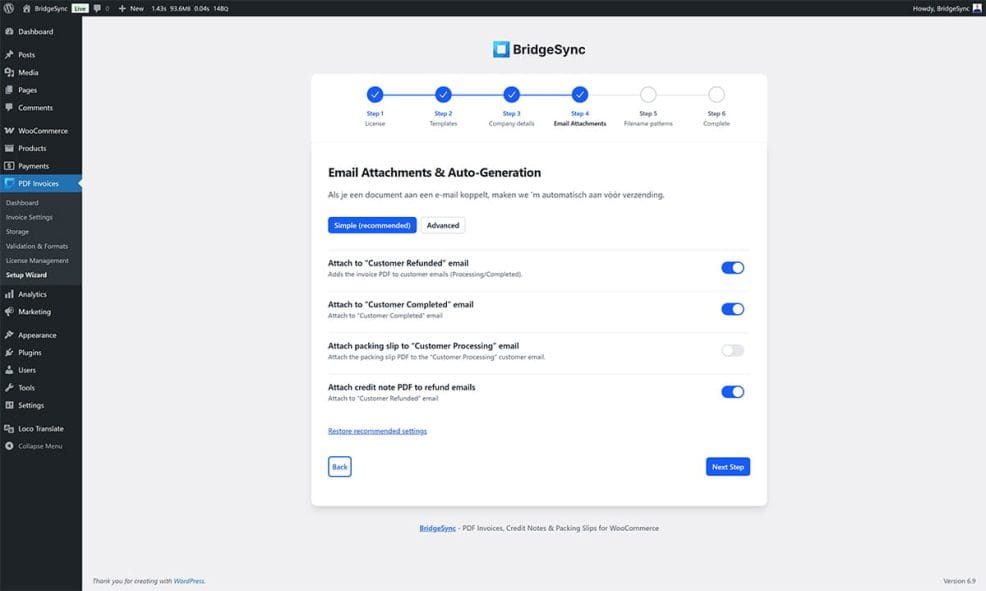
Configure email attachments
Takes: 2 minutes
Step 4 determines which PDFs automatically attach to which WooCommerce emails.
Simple mode (recommended)
The Simple tab shows the most common options:
| Setting | What it does | Recommended |
|---|---|---|
| Attach to "Customer Refunded" email | Sends invoice with refund notification | ✓ On |
| Attach to "Customer Completed" email | Sends invoice when order completes | ✓ On |
| Attach packing slip to "Customer Processing" email | Sends packing slip when order starts processing | Off (usually internal) |
| Attach credit note PDF to refund emails | Sends credit note with refund notification | ✓ On |
Advanced mode (e-invoices)
Click the Advanced tab if you need to send machine-readable e-invoices for B2B customers or accountants:
- UBL (XML) — Standard EU e-invoice format (EN16931)
- CII (XML) — Alternative e-invoice format
- Also attach UBL when embedded (hybrid) — For recipients who need both PDF and XML
Most stores can leave Advanced settings off and enable them later if a customer requests e-invoices.
Click Next Step when done.
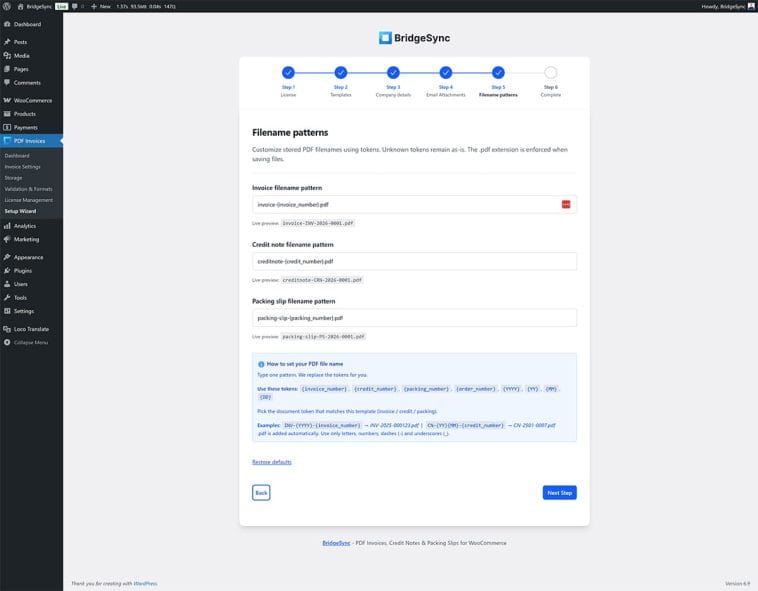
Set filename patterns
Takes: 2 minutes
Step 5 lets you customize how PDF files are named when stored. The plugin uses tokens that get replaced with actual values.
Default patterns
| Document | Default pattern | Example output |
|---|---|---|
| Invoice | invoice-{invoice_number}.pdf |
invoice-INV-2026-0001.pdf |
| Credit note | creditnote-{credit_number}.pdf |
creditnote-CRN-2026-0001.pdf |
| Packing slip | packing-slip-{packing_number}.pdf |
packing-slip-PS-2026-0001.pdf |
Available tokens
| Token | What it shows |
|---|---|
{invoice_number} |
Sequential invoice number |
{credit_number} |
Sequential credit note number |
{packing_number} |
Sequential packing slip number |
{order_number} |
WooCommerce order number |
{YYYY} |
4-digit year (2026) |
{YY} |
2-digit year (26) |
{MM} |
2-digit month (01-12) |
{DD} |
2-digit day (01-31) |
If you want invoice files named like INV-2026-01-000123.pdf, use:
INV-{YYYY}-{MM}-{invoice_number}.pdf
Click Next Step when done.
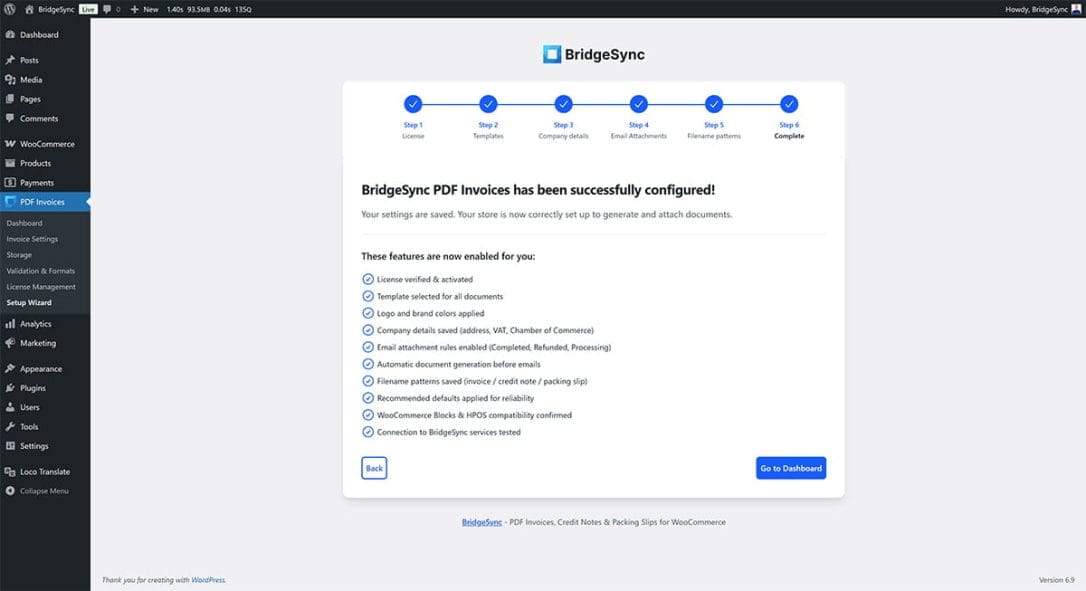
Setup complete!
Takes: 1 minute
Step 6 confirms that everything is configured correctly. You'll see a list of features that are now enabled:
- ✓ License verified & activated
- ✓ Template selected for all documents
- ✓ Logo and brand colors applied
- ✓ Company details saved (address, VAT, Chamber of Commerce)
- ✓ Email attachment rules enabled
- ✓ Automatic document generation before emails
- ✓ Filename patterns saved
- ✓ Recommended defaults applied for reliability
- ✓ WooCommerce Blocks & HPOS compatibility confirmed
- ✓ Connection to BridgeSync services tested
Click Go to Dashboard to open the plugin dashboard.
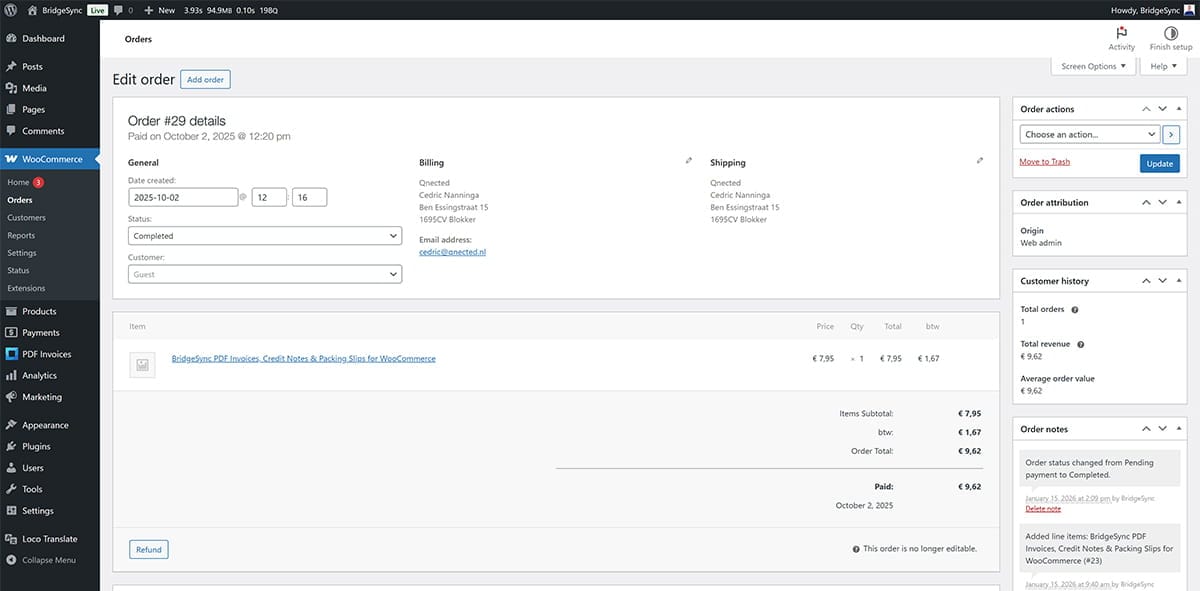
Test your setup
Takes: 3 minutes
Generate a test invoice
- Go to WooCommerce → Orders
- Open any existing order (or create a test order)
- Look for the PDF Invoices meta box in the order sidebar
- Click Generate Invoice or Download Invoice
- Verify the PDF shows your logo, colors, and company details correctly
Test email attachments
- Open the same order
- Use the Order Actions dropdown to resend an email (e.g., "Resend order details to customer")
- Check your email inbox to confirm the PDF is attached
You’re all set!
BridgeSync PDF Invoices is now configured and will automatically generate documents for your orders.
What to do next