Before installing BridgeSync, verify your WooCommerce store meets these technical requirements. This 5-minute check prevents installation issues and ensures smooth Bol.com order syncing from day one.
| What you need | Minimum version required | How to verify |
|---|---|---|
| WordPress | 6.5 or newer | Check your WordPress version |
| WooCommerce | 9.0 or newer (required for HPOS) | Check your WooCommerce version |
| HPOS (High-Performance Order Storage) | Must be enabled in WooCommerce settings | Verify HPOS is enabled |
| PHP | 8.1 or newer (managed by your host) | Check your PHP version |
| WP-Cron | Must be running (handles automatic sync) | Test WP-Cron status |
| Bol.com retailer account | Active seller account with API access | Get your API credentials |
WordPress 6.5 or newer
WordPress is the content management system that runs your website. BridgeSync requires WordPress 6.5 or later to function correctly.
Why this matters: WordPress 6.5 includes essential security updates and performance improvements that BridgeSync relies on for stable Bol.com integration. Older versions may cause sync failures or security vulnerabilities.
WooCommerce 9.0 or newer
WooCommerce is the e-commerce plugin that powers your online store. If you're already selling products through WordPress, you have WooCommerce installed.
Why this matters: WooCommerce 9.0 introduced HPOS (explained below), which BridgeSync requires for reliable order syncing. Earlier versions use an outdated order storage system that can't handle automated Bol.com imports efficiently.
HPOS (High-Performance Order Storage)
HPOS is WooCommerce's modern order management system. Instead of storing orders as WordPress posts (the old method), HPOS uses a dedicated database structure that handles large order volumes much faster.
Why this matters: HPOS processes orders 10x faster than the legacy system. When BridgeSync imports hundreds of Bol.com orders per day, HPOS prevents your store from slowing down. Without HPOS, automatic order sync can fail or timeout.
Good news: If you set up WooCommerce recently (after late 2023), HPOS is probably already enabled by default. You can verify this in 2 minutes using the instructions below.
PHP 8.1 or newer
PHP is the server-side programming language that powers WordPress and WooCommerce behind the scenes. Your web hosting company controls which PHP version your site uses (you don't need to know any PHP coding).
Why this matters: PHP 8.1 and newer versions are significantly faster and more secure than older versions. BridgeSync is built using modern PHP features that aren't available in PHP 7.4 or earlier. Using outdated PHP also creates security risks for your entire store.
WP-Cron working correctly
WP-Cron is WordPress's built-in task scheduler. It runs automated background jobs like sending emails, publishing scheduled posts, and (most importantly for you) syncing orders from Bol.com at regular intervals.
Why this matters: Without a working WP-Cron, BridgeSync can't automatically import new Bol.com orders. You'd have to manually trigger syncs every time, defeating the entire purpose of automation. WP-Cron runs your sync schedule (every 5, 15, or 30 minutes depending on your settings).
Bol.com retailer account with API access
You need an active Bol.com seller account (accessed at partner.bol.com) with API credentials enabled. This is different from a regular Bol.com shopping account where you buy products.
Why this matters: API credentials (Client ID and Client Secret) are how BridgeSync securely communicates with Bol.com to fetch orders, update stock, and send invoices. Without valid API access, BridgeSync cannot connect to your Bol.com store at all.
Step-by-step instructions to verify your setup
How to check your WordPress version
- Log in to your WordPress admin dashboard
- Scroll down to the very bottom of any page in the WordPress admin area
- Look in the bottom-right corner for text that says "WordPress 6.5.3" (or similar version number)
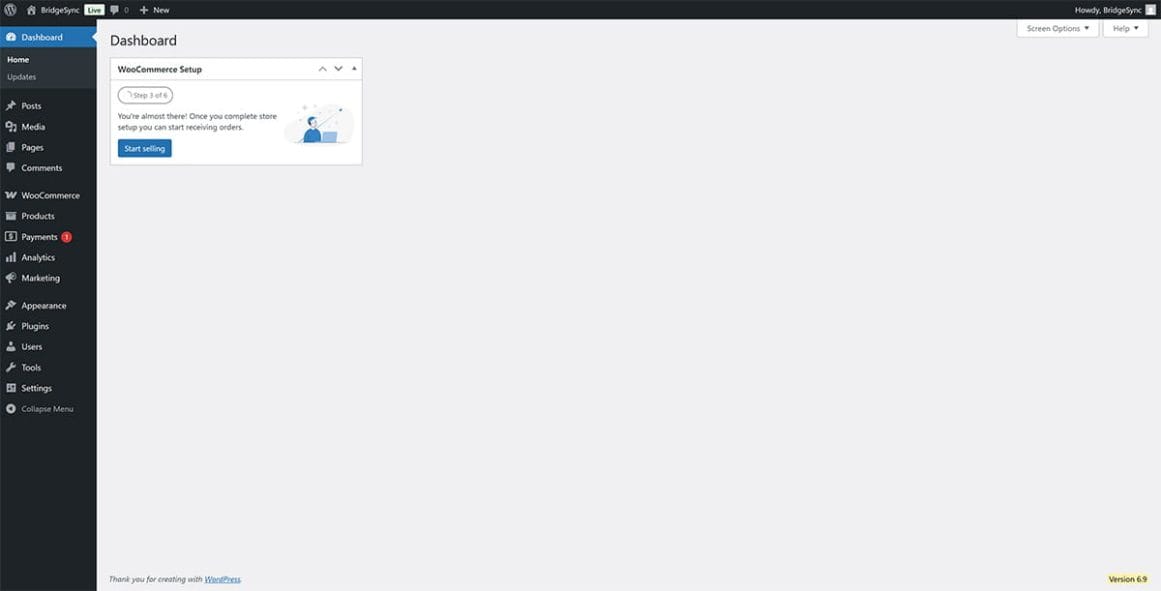
If you need to update WordPress: Go to Dashboard → Updates in the left sidebar. If a newer version is available, click "Update Now" and wait for the update to complete (usually takes 1-2 minutes).
How to check your WooCommerce version
- Go to Plugins → Installed Plugins in your WordPress sidebar
- Scroll through the plugin list until you find "WooCommerce"
- Look directly below the plugin name where it shows "Version 9.0.2" (or your current version)
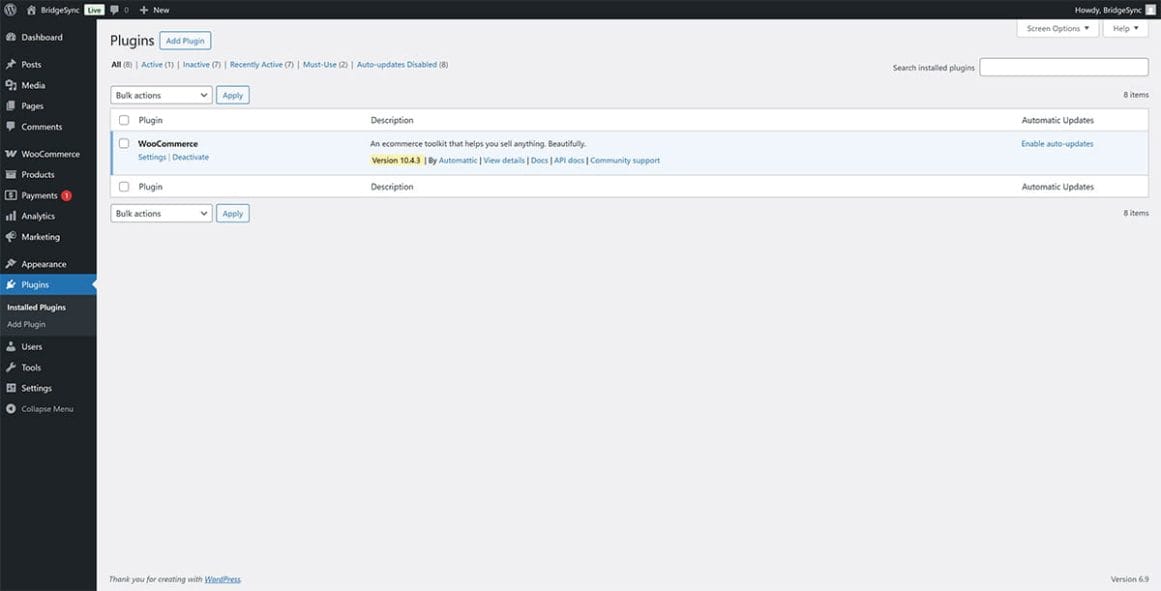
If you need to update WooCommerce: If you see an "Update now" link below the WooCommerce plugin, click it. Always backup your store before updating WooCommerce (most hosts offer one-click backups).
How to enable HPOS in WooCommerce
- Go to WooCommerce → Settings in your WordPress sidebar
- Click the Advanced tab in the top navigation bar
- Click Features in the secondary navigation that appears
- Scroll down until you find "High-Performance Order Storage (HPOS)"
- Check the box next to "Enable High-Performance Order Storage" if it's not already checked
- Scroll to the bottom and click Save changes
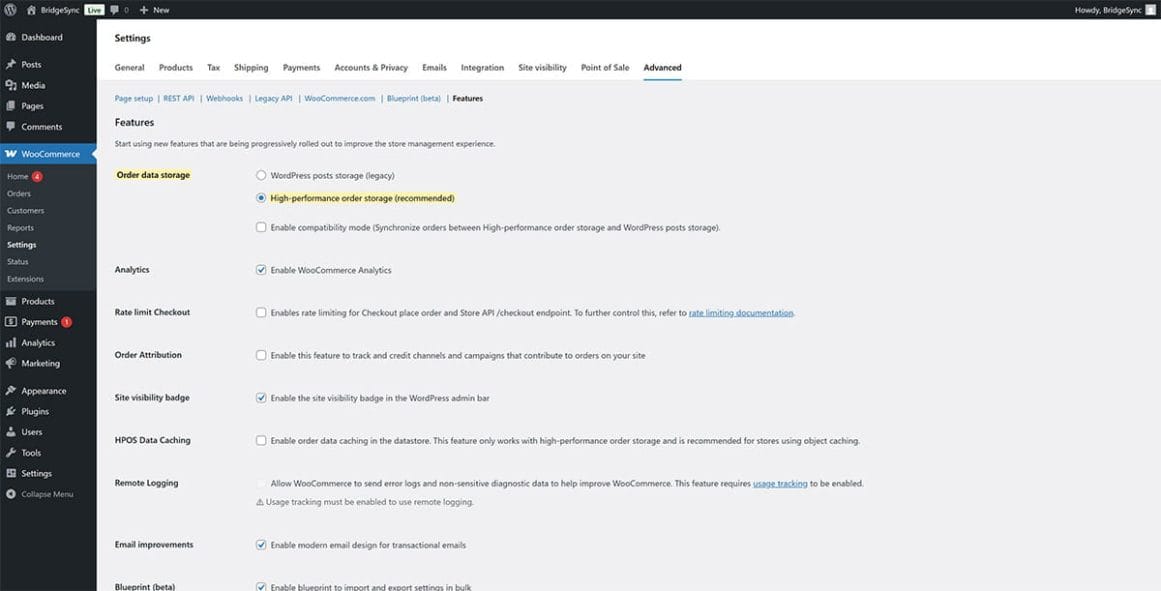
Don't see the HPOS option? This usually means your WooCommerce version is too old (below 9.0). Update WooCommerce first, then return to this page to enable HPOS.
Important for stores with existing orders: When you enable HPOS for the first time, WooCommerce will automatically migrate your existing orders to the new storage system. This process runs in the background and can take 5-30 minutes depending on how many orders you have. Your store remains online during migration.
How to check your PHP version
You cannot change PHP versions yourself (your hosting company manages this). Here are two ways to check which PHP version your site is currently using:
Method 1: Using WordPress Site Health
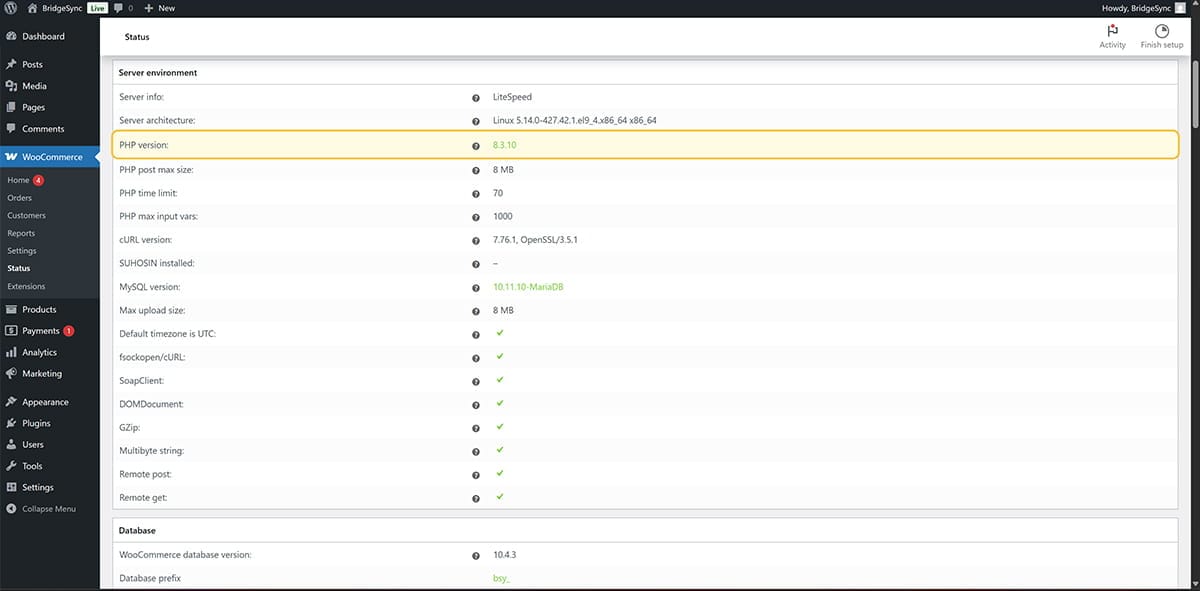
- Go to Tools → Site Health in your WordPress sidebar
- Click the Info tab at the top
- Click to expand the "Server" section
- Look for the line that says "PHP version" followed by a number like "8.1.25" or "8.2.14"
Method 2: Contact your hosting provider
Open a support ticket or live chat with your hosting company and ask: "What PHP version is currently running on my website?" They can tell you instantly.
If you need to upgrade PHP: Contact your hosting provider and request an upgrade to PHP 8.1 or newer. Most hosts offer this as a free service through their control panel (cPanel, Plesk, custom dashboard) or via support ticket. The upgrade usually takes 5-10 minutes and causes no downtime.
How to verify WP-Cron is working
WP-Cron runs automatically whenever someone visits your WordPress site. Here's how to confirm it's functioning correctly:
- Install and activate BridgeSync (you can test WP-Cron after installation)
- Go to BridgeSync → Settings in your WordPress sidebar
- Look for the "Last successful sync" timestamp near the top of the settings page
- If this timestamp updates every 5-30 minutes (depending on your sync schedule), WP-Cron is working
Troubleshooting if syncs aren't running automatically:
- Low traffic sites: WP-Cron only triggers when someone visits your site. If you have very few visitors, syncs may be delayed.
- Disabled WP-Cron: Some hosting providers disable WP-Cron to reduce server load. Check with your host or look for "DISABLE_WP_CRON" in your wp-config.php file.
- Server configuration issues: Firewall rules or security plugins might block WP-Cron from running properly.
See our detailed WP-Cron troubleshooting guide for step-by-step solutions.
How to get your Bol.com API credentials
Your Bol.com API credentials allow BridgeSync to securely access your orders, stock levels, and invoices. Here's how to create them in your Bol.com seller account:
- Go to login.bol.com and log in with your seller account email address and password
- Click your account name in the top-right corner (with the arrow pointing down) and select Settings
- In the left sidebar, click Services to expand the menu
- Click API Settings
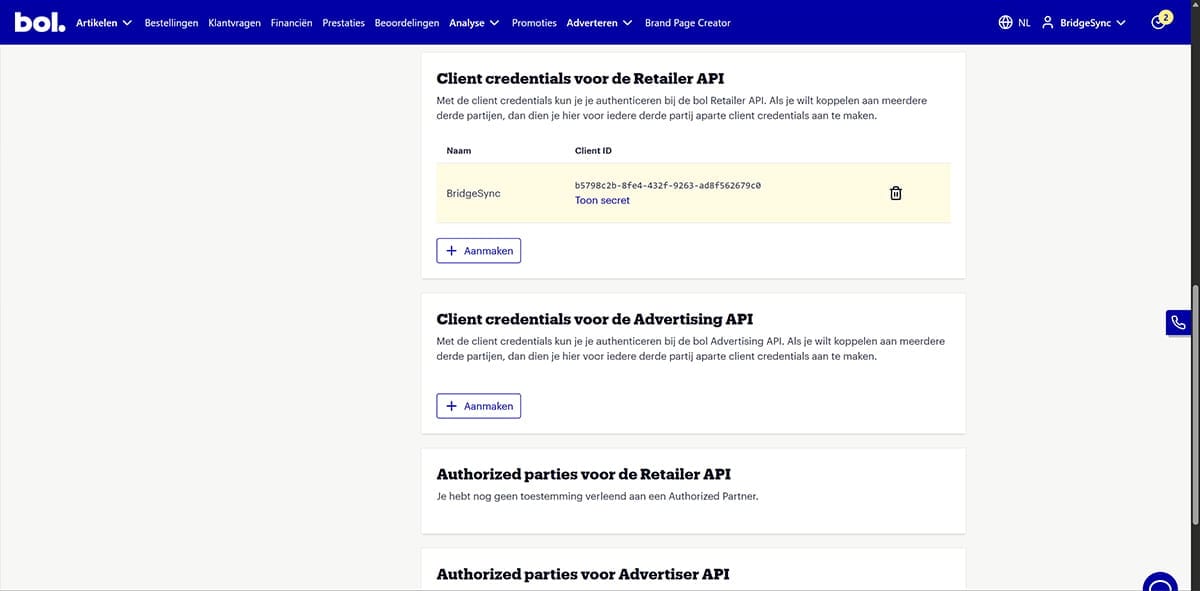
- Scroll down to the section Client credentials for the Retailer API
- Click the + Create button
- Enter a recognizable name for your new API user (for example:
BridgeSync) and click Create - Your new credentials appear in the list. Copy the Client ID (the long code next to your chosen name)
- Click Show secret to reveal the Client Secret, then copy it immediately
Use the correct API section
The Bol.com API Settings page shows multiple sections. Make sure you create credentials under Client credentials for the Retailer API. Do not use "Client credentials for the Advertising API" or "Authorized parties" sections — these won't work with BridgeSync.
Save your Client Secret immediately
After clicking "Show secret", copy your Client Secret right away and store it somewhere safe. Bol.com only shows the secret once. If you lose it, you'll need to delete the credentials and create new ones.
First time setting up API access? You may need to fill in the "Technical representative" section first (your name, email, and phone number) and agree to the API Terms of Service before you can create credentials.
Recommended hosting requirements for BridgeSync
BridgeSync works with any WordPress hosting provider. For optimal performance when syncing Bol.com orders automatically, choose a host that offers:
- PHP 8.1 or newer (faster order processing and better security)
- Managed WordPress hosting or WooCommerce-optimized servers (pre-configured for e-commerce)
- WP-Cron support enabled by default (required for automatic sync intervals)
- SSL certificate included (ensures secure API connections to Bol.com)
- At least 512MB PHP memory limit (handles batch order imports without timeouts)
Hosting providers confirmed compatible with BridgeSync: SiteGround, Kinsta, Cloudways, TransIP, Antagonist, Savvii, and most major WordPress hosting companies.
Not sure if your site meets the requirements?
Don't worry if you're unsure about any of these technical requirements. Here are two easy ways to proceed:
- Install BridgeSync anyway. The plugin will automatically detect missing requirements and display clear warning messages telling you exactly what needs to be fixed.
- Contact our support team and we'll check your WordPress setup for you. Just provide your site URL and we'll verify all requirements within 24 hours.
Our support team helps dozens of stores set up BridgeSync every week. We're happy to guide you through any technical issues.