Setup time: 15 minutes to go from zero to your first Bol.com order in WooCommerce
This guide shows you exactly how to connect your WooCommerce store to Bol.com and start importing orders automatically. No technical knowledge required, just follow these 5 steps.
What you need before starting
Make sure you have access to:
- Your WooCommerce store (already installed and running)
- Your BridgeSync license key from your purchase confirmation email or account dashboard
- A Bol.com retailer account, this is your seller account at partner.bol.com, not a regular Bol.com shopping account
- Your Bol.com API credentials (Client ID and Client Secret), don't worry, we'll show you exactly where to find these in Step 3
Install and activate BridgeSync on your WooCommerce store
Takes: 2 minutes
You received the BridgeSync Bol.com Connector plugin as a .zip file via email after starting your trial or purchasing a
license. You can also download it anytime from your
BridgeSync account dashboard.
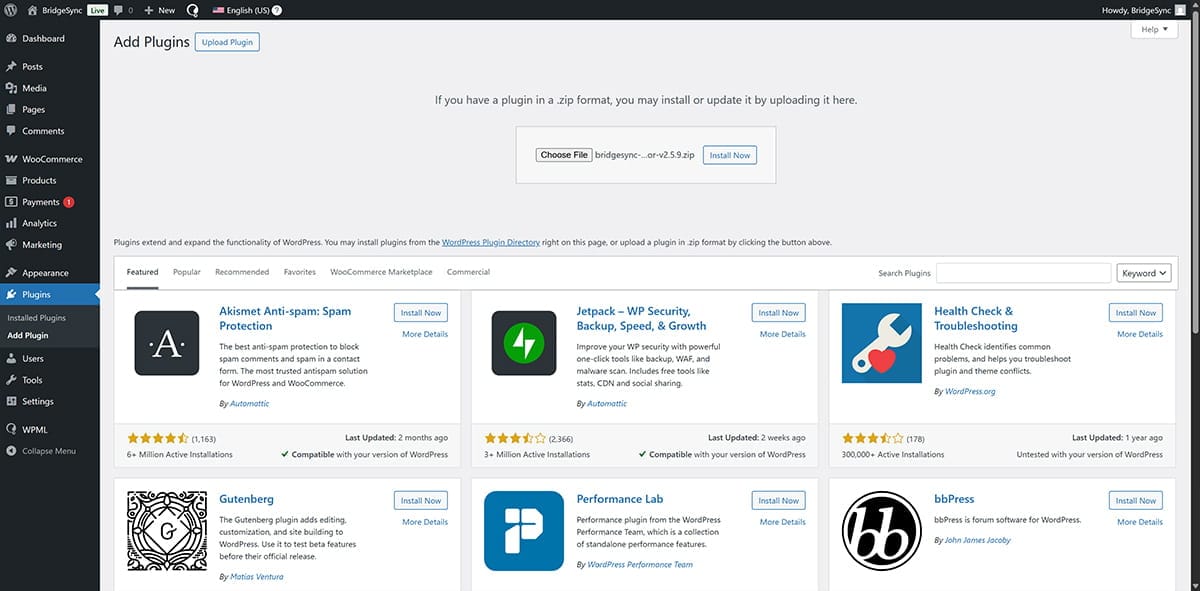
- In WordPress, go to Plugins → Add Plugin
- Click Upload Plugin at the top of the page
- Click Choose File and select the BridgeSync plugin file from your computer (filename
format:
bridgesync-bol-connector-v*.*.*.zipwhere *.*.* is the version number, for examplev2.5.9) - Click Install Now and wait for the upload to complete
- Click Activate Plugin when installation finishes
Success check
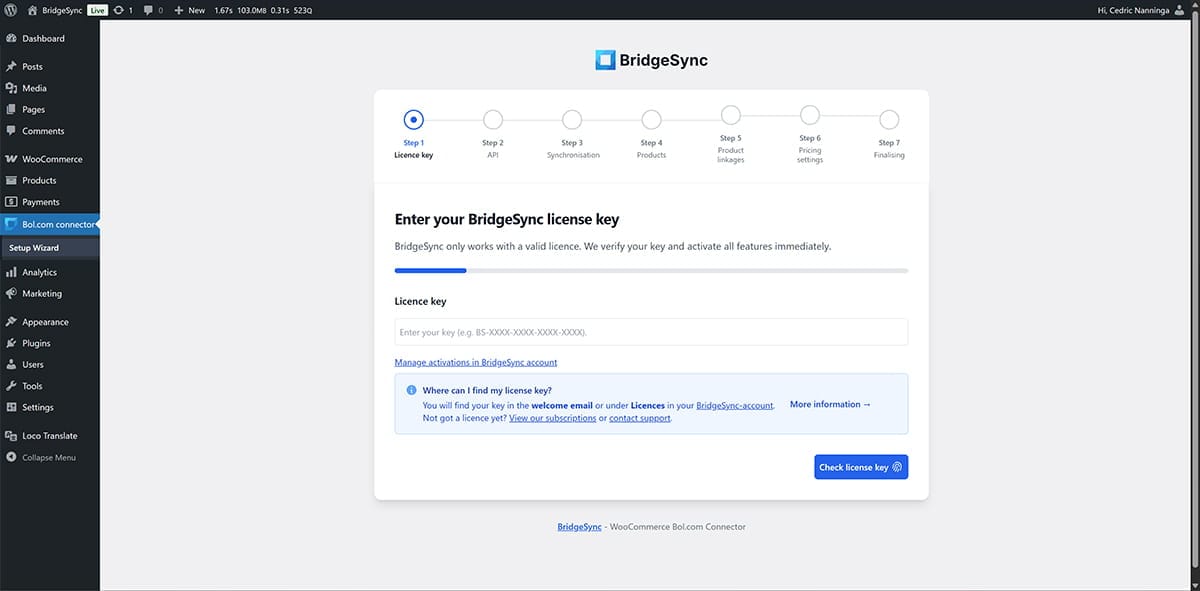
After activation, WordPress automatically redirects you to the BridgeSync Setup Wizard. If the wizard doesn't open automatically, look in your WordPress sidebar for the new "Bol.com connector" menu item and click it to launch the wizard.
Enter your BridgeSync license key
Takes: 1 minute
The Setup Wizard automatically opens after plugin activation. The first step asks you to enter your BridgeSync license key to unlock all features and enable your WooCommerce Bol.com integration.
Where to find your license key
Your license key is available in two places:
- In the purchase confirmation email you received from BridgeSync (check your inbox and spam folder)
- In your BridgeSync account dashboard under "Licenses"
Activate your license
- In the Setup Wizard Step 1: License key, you'll see the license key input field
- Copy your license key from your email or account dashboard
- Paste the license key into the License key field
- Click Check license key and wait a few seconds for validation
Success check
You'll see a confirmation that your license is valid. The wizard automatically advances to Step 2: API where you'll connect to Bol.com.
License check failed? Try these fixes:
- Double check you copied the entire license key with no missing characters or extra spaces
- Verify you're using a valid, active license (not expired or already activated on another site)
- Make sure your WordPress site can connect to the internet (required for license validation)
- If you have multiple licenses, make sure you're using the correct one for this website
Still having issues? Contact our support team with your license key for assistance.
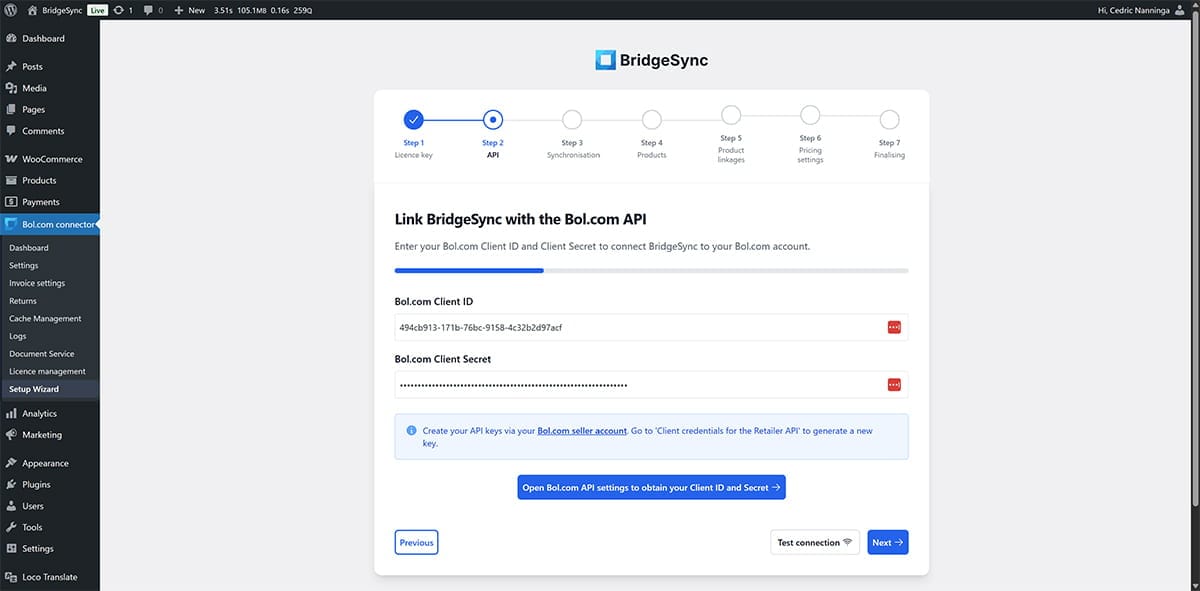
Link BridgeSync with the Bol.com API
Takes: 5 minutes
After your license is validated, the Setup Wizard advances to Step 2: API. This is where you connect BridgeSync to Bol.com using your API credentials. Think of API credentials as a secure password that lets BridgeSync access your Bol.com orders and products without needing your regular login details.
Get your Bol.com API credentials
You need two pieces of information from your Bol.com retailer account:
- Client ID: a unique identifier (looks like a long code)
- Client Secret: your private API key (treat this like a password, never share it publicly)
The easiest way: click the blue Open Bol.com API settings to obtain your Client ID and Secret button in the wizard. This takes you directly to the right page in your Bol.com account.
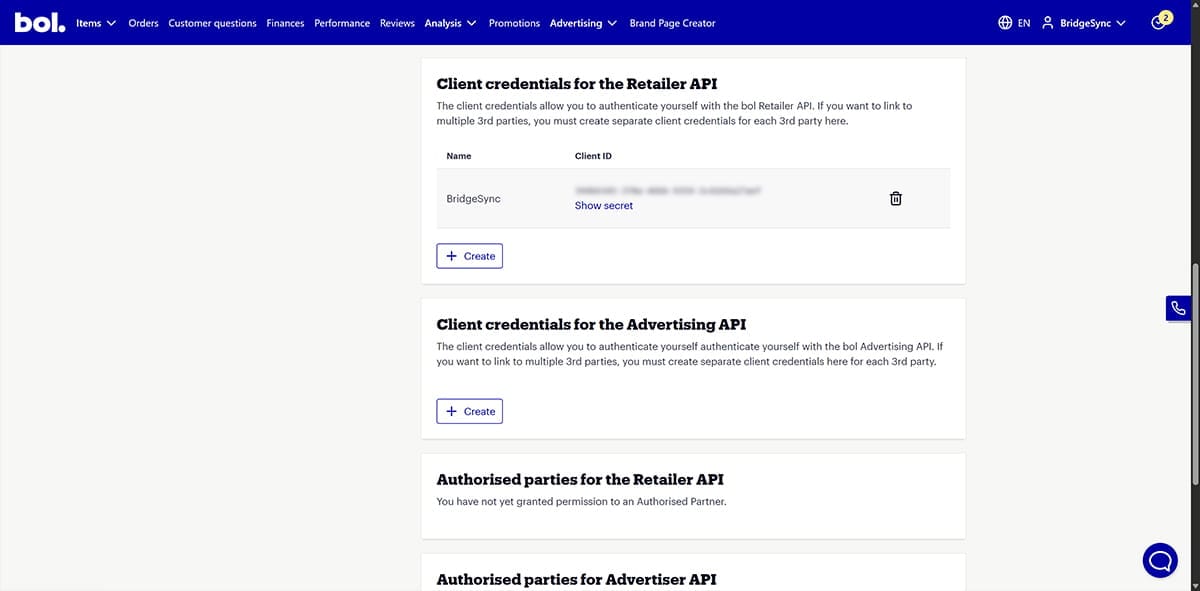
Here's how to create new API credentials in Bol.com:
- Open a new browser tab and go directly to Bol.com API settings
- Log in with your Bol.com retailer account (your seller login, not your personal Bol.com account)
- Scroll to the section Client credentials for the Retailer API (important: not "Advertising API" or "Authorized parties")
- Click the + Create button
- Enter a name for your new API user (for example:
BridgeSync) and click Create - Your new credentials appear in the list. Copy the Client ID (the long code next to your chosen name)
- Click Show secret to reveal the Client Secret, then copy it
Use the correct API section
The Bol.com API settings page shows multiple sections. Make sure you create credentials under Client credentials for the Retailer API. Do not use "Client credentials for the Advertising API" or "Authorized parties" sections, as these won't work with BridgeSync.
Enter your API credentials in BridgeSync
- Return to the BridgeSync Setup Wizard in WordPress (you should be on Step 2: API)
- Paste your Client ID into the Bol.com Client ID field
- Paste your Client Secret into the Bol.com Client Secret field
- Click Test connection to verify your credentials, or click Next directly (BridgeSync will test the connection automatically before proceeding)
- Wait a few seconds while BridgeSync verifies your credentials with Bol.com
Success check
You should see a green success message saying "Great, the connection succeeded! Your API keys are correct." This means WooCommerce can now communicate with your Bol.com store. Click Next to continue to synchronization settings.
Connection test failed? Try these fixes:
- Verify you created credentials under Client credentials for the Retailer API (not Advertising API)
- Make sure you copied the entire Client ID and Client Secret with no missing characters
- Check for extra spaces at the beginning or end of each field, remove them if you find any
- Verify you're logged into your Bol.com retailer account, not a personal shopping account
- Try creating new API credentials in Bol.com and use those instead
Still stuck? Jump to our API connection troubleshooting guide.
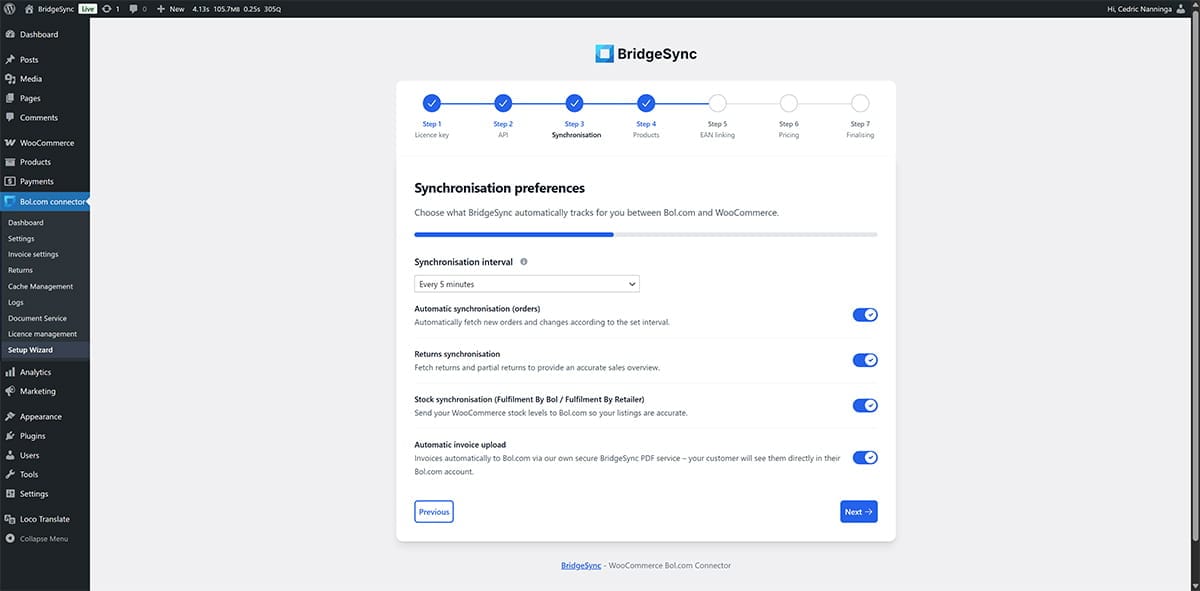
Choose your synchronization preferences
Takes: 2 minutes
After your API connection is verified, click Next in the Setup Wizard to reach Step 3: Synchronization. Here you'll choose what BridgeSync automatically tracks between WooCommerce and Bol.com. This is where the automation happens.
- First, choose your synchronization interval, how often BridgeSync checks Bol.com for updates:
- Every 5 minutes – best for high-volume stores (20+ orders per day)
- Every 15 minutes – recommended for most stores (good balance of speed and server load)
- Every 30 minutes – suitable for smaller stores (5-15 orders per day)
- Every hour – for low-volume stores (a few orders per day)
- Once daily – only if you have very few Bol.com sales
- Then review the sync features and toggle on the ones you need:
| Sync Feature | What This Does |
|---|---|
| Automatic synchronization (orders) | Automatically fetches new orders and changes according to your set interval |
| Returns synchronization | Fetches returns and partial returns to provide an accurate sales overview |
| Stock synchronization (Fulfillment By Bol / Fulfillment By Retailer) | Sends your WooCommerce stock levels to Bol.com so your listings stay accurate (prevents overselling) |
| Automatic invoice upload | Uploads invoices automatically to Bol.com via the secure BridgeSync PDF service, so your customers see them directly in their Bol.com account |
- We recommend enabling at least Automatic synchronization (orders) and Stock synchronization for most stores
- Click Next to continue to product configuration
Success check
Your sync preferences are saved automatically when you click Next. BridgeSync will start checking Bol.com based on your chosen interval. You'll continue to Step 4: Products.
About the remaining wizard steps
The Setup Wizard includes additional steps for Products (Step 4) and Pricing settings (Step 6). Most stores can use the default settings and simply click Next to continue. We'll cover the important Product linkages step (Step 5) next.
Configure product linkages with EAN codes
Takes: 2 minutes
In Step 5: Product linkages, you tell BridgeSync how to match your WooCommerce products to Bol.com listings. BridgeSync links products by matching EAN codes (also called barcodes or GTIN numbers). Once products are linked, stock levels sync automatically.
Tell BridgeSync where your EAN codes are stored
Choose where you store EAN codes in WooCommerce:
| Option | When to use |
|---|---|
| GTIN, EAN, UPC or ISBN | Default WooCommerce 9.5+ field. Use this if you're on a recent WooCommerce version and store barcodes in the built-in GTIN field. |
| SKU (Stock Keeping Unit) | For older WooCommerce versions. Use this if you store EAN/barcode numbers in the SKU field. |
| Custom field | Via product properties, ACF or other custom value. Use this if you have a plugin that adds a dedicated EAN or barcode field. |
- Select the option that matches where you store your EAN codes
- BridgeSync will show a preview of products with their detected EAN codes
- Look for the green "Valid EAN/GTIN codes found!" message to confirm your products can be linked
- Click Next to continue through Pricing settings (Step 6) to the final step

Success check
After completing the final step (Step 7: Finalizing), you'll see a confirmation screen titled "BridgeSync has been activated successfully!" with a summary of all enabled features. Click Go to dashboard to start using BridgeSync.
No EAN codes yet?
You can complete the wizard now and add EAN codes to your products later. BridgeSync will automatically link products once valid EAN codes are added.
You're done! BridgeSync is now syncing your store.
BridgeSync is now connected and will automatically import Bol.com orders into WooCommerce based on your sync schedule. No more manual order entry or copy-pasting.
How to verify orders are importing correctly
- Go to WooCommerce → Orders in your WordPress dashboard
- Wait for your next sync interval (if you chose "every 15 minutes," check back in 15 minutes)
- New orders from Bol.com should appear in your WooCommerce order list
- Look for the Bol.com order ID on each order to confirm it came through the sync
Recommended next steps to optimize your sync
- Link all your remaining products so your entire catalog syncs stock with Bol.com
- Enable automatic invoice uploads to save hours of manual PDF uploading
- Browse the glossary if you see any unfamiliar terms like EAN, HPOS, or WP-Cron